cds-for-code
How to: Use templates in CDS for Code
Table of Contents
Template Explorer
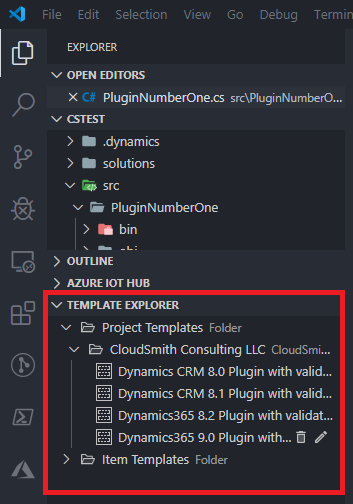
Template Explorer can be found below the workspace in the VSCode File Explorer window. Template Explorer helps you manage templates with the ability to add, edit and delete them. Right-clicking a template in template explorer will allow you to go directly to the template directory for editing the template, create the templated project or item in your workspace, or export the template as a shareable zip file.
Note: All templates will be asked for a publisher and category(ies) for grouping when displayed. See more about grouping here.

Project Templates
Project templates are a collection of templated files in a directory structure. These project templates can be targeted at any language or project type. CDS For Code comes with built in project templates for creating CDS Plugins quickly, targeted at any version supported by CDS For Code.
Item Templates
Item templates are individual file templates saved into CDS For Code templates. These can be single files of any type.
Configurable grouping
Templates in CDS for Code can be grouped in the following ways:
- By Publisher
- By Category
When creating a template you will be asked for a publisher and template categories. The name/items selected will show the templates in Template Explorer based on what was chosen.
To change how templates are grouped in Template Explorer:
- Open the file menu
- Select Preferences
- Select Settings
- Navigate to Extensions > CDS for Code
- Change the setting Cs › Cds › Configuration › Templates: Tree View Group Preference
It should look similar to this:

Creating a template
Creating a Project Template
Creating a project template can be performed the following ways:
- Using VSCode File Explorer
- Using the plus icon on Template Exporer
- Using the VSCode Command Palette (Ctrl + Shift + P)
Note: For .NET projects it is recommended to delete the bin and obj folders before creating a project template out of it.
Below is an example of creating a project template using VSCode File Explorer:

Creating a File Template
Creating a file template can be performed the following ways:
- Using VSCode File Explorer
- Using the plus icon on Template Exporer
- Using the VSCode Command Palette (Ctrl + Shift + P)
Below is an example of creating a file template using VSCode File Explorer:

Tokens and token format
CDS for Code templating supports tokens for inputs to be run during interpolation of creating a project or file from a template. The default regular expression used is #{([\s\S]+?)} but this can be change in the settings.
By default templates can use #{variableName} in the following manners:
- As token to be written within a file
- As a file name or directory name
These can be put anywhere in the template and the processor will find them prompting the user for inputs for them.
Your template can also include a template.json file which will help define more things such as naming of the output directory, placeholder tokens description with optional required, and directives that will tell the processor to skip tokens on certain files. Having a template.json file is not required for the processor to replace tokens, although helps the processor by defining required fields and directives for skipping interpolation on certain files.
You can see an example of one of our templated projects here. Be sure to also check out the associated template.json file found here.
Interpolation
Template interpolation will occur when the template is being used to create a new project or item. The template processor will read from any placeholders, prompting the user to give values for them.
Once the user has filled in all required values the processor will execute the token replacement during template creation in your workspace.
Exporting templates
Right-clicking any template in Template Explorer will provide the ability to export a template for sharing with friends or co-workers.
Here is an example of exporting a template:

Importing templates
Right-clicking template explorer headers or folders will provide the ability to import a template.
Here is an example of importing a template:

Create a project from a template
- Using VSCode File Explorer
- Using right-click > Create in Workspace
- Using the VSCode Command Palette (Ctrl + Shift + P)
Here is an example of creating a project from a template:

What’s not included
- Custom template binding
- Templates used as code generators